(Added more quotes.) Tag: Visual edit |
No edit summary |
||
| Line 1: | Line 1: | ||
| − | {{Games| |
+ | {{Games|RA1|CS|AM}} |
| − | {{ |
+ | {{UnitBox |
| + | |name = Rifle infantry |
||
| − | |name = The Moon Shall Never Have Them |
||
| + | |cameo = [[File:CNCRA_Minigunner_Low_Res_Cameo.png]] [[File:CNCRA_Rifle_Infantry_Cameo.png]] [[File:RAR Rifle Infantry Cameo.png|64px]] |
||
| − | |width = 280px |
||
| + | |image=CNCRA_Rifle_Infantry.png |
||
| − | |prev = [[The Great Bear Trap]] |
||
| ⚫ | |||
| − | |conc = |
||
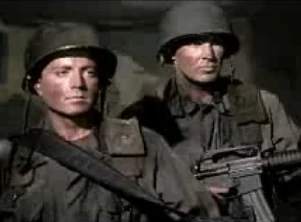
| + | |imgdesc=Allied rifle infantry (right) and Soviet rifle infantry (left) |
||
| − | |next = [[The Uprising]] |
||
| + | |internalname = E1 |
||
| − | * [[End of Tradition]] |
||
| + | |faction={{Infoicon|Allies|RA1}} <br> {{Infoicon|Soviets|RA1}} |
||
| − | * [[Raid on Lost Castle]] |
||
| + | |baseunit= |
||
| − | * [[Greed of the Vanquished]] |
||
| + | |role=Basic infantry |
||
| − | |image = Premier_Shuttle_Station.png |
||
| + | |useguns=[[M16]] ([[Allies]])<br>[[AK-47]] ([[Soviets]])<br>M1 Carbine (cameo image, game data) |
||
| ⚫ | |||
| + | |usearmor=N/A |
||
| − | |imgdesc = Cherdenko's shuttle space station converted from the [[Peter and Paul Fortress]] |
||
| + | |hp=50 |
||
| − | |conflict = {{L|Third World War|Red Alert 3}} |
||
| + | |shield= |
||
| − | |date = |
||
| + | |energy= |
||
| − | |place = [[Leningrad]], [[Russia]] |
||
| + | |timedlife= |
||
| − | |result = Decisive Allied victory |
||
| + | |armortype=N/A |
||
| − | * Soviet Union capitulated |
||
| + | |trans= |
||
| − | * [[Cherdenko]] and [[Krukov]] captured |
||
| + | |cost=$100 |
||
| − | * [[The Uprising]] starts by a [[Raid on Lost Castle]] |
||
| + | |time= |
||
| − | |side1 = {{Subfaction|Allies|RA3}} |
||
| + | |tier=1 |
||
| − | |side2 = {{Subfaction|USSR|RA3}} |
||
| + | |produced=[[Allied barracks (Red Alert 1)|Allied barracks]]<br>[[Soviet barracks (Red Alert 1)|Soviet barracks]] |
||
| − | |goal1 = * Unpack MCVs at chrono drop zones and use the reinforcements to clear Soviet forces from the plateau |
||
| + | |req= |
||
| − | * Destroy all seven Iron Curtain devices to bring down the protective field over the launch facility |
||
| + | |techlvl=1 |
||
| − | * Stop the launch of Cherdenko's rocket |
||
| + | |hotkey= |
||
| − | |goal2 = * Destroy the Allied divisions |
||
| + | |groundattack=15 (SA) |
||
| − | * Protect the space shuttle until it launches |
||
| + | |airattack= |
||
| − | |commanders1 = {{ubl |
||
| + | |cooldown=20 frames |
||
| − | |{{Flag|Allies|RA3}} {{L|Allied Commander|Red Alert 3}} |
||
| + | |armor= |
||
| − | |{{Flag|Allies|RA3}} [[Warren Fuller]] |
||
| + | |airspeed= |
||
| + | |landspeed=4 |
||
| + | |seaspeed= |
||
| + | |range=3 |
||
| + | |sight=4 |
||
| + | |parent= |
||
| + | |addons= |
||
| + | |evolvesto= |
||
| + | |power= |
||
| + | |produce= |
||
| + | |allows= |
||
| + | |research= |
||
| + | |ability= |
||
| + | |structure= |
||
}} |
}} |
||
| + | '''Rifle infantry''' are the basic light infantry of the [[Allied]] and [[Soviet]] armies in [[Red Alert 1]]. Flexible and cheap but individually weak, they are the core of both the Allied and Soviet armies. |
||
| − | |commanders2 = {{ubl |
||
| − | |{{Flag|USSR|RA3}} [[Anatoly Cherdenko]] |
||
| − | |{{Flag|USSR|RA3}} [[Nikolai Krukov]] |
||
| − | }} |
||
| − | |forces1 = Full Allied arsenal |
||
| − | * {{L|Tanya|Red Alert 3}} |
||
| − | * [[Proton collider]] |
||
| − | |forces2 = Full Soviet arsenal |
||
| − | * [[Natasha Volkova]] |
||
| − | * [[Vacuum imploder]] |
||
| − | |notes = |
||
| − | }} |
||
| − | {{Q|Bring it down commander. MAKE THEM PAY FOR THEIR LIES AND BETRAYAL!|[[Bingham]]}} |
||
| − | '''The Moon Shall Never Have Them''' is the ninth and final [[Allied]] mission of ''[[Command & Conquer: Red Alert 3]]''.<ref name="RA3_Allied9">Electronic Arts Los Angeles, ''[[Command & Conquer: Red Alert 3]]''. Allied mission 9: "The Moon Shall Never Have Them".</ref> |
||
| − | == |
+ | ==Background== |
| + | As basic infantry, riflemen often take the brunt of an assault. They are armed with assault rifles that just entered widespread use at the beginning of the war (the [[AK-47]] in the [[Soviet Union]] and the [[M16]] among the [[Allies]]) and usually don't wear much protection - usually only fatigues and steel helmets. |
||
| − | Now knowing that the [[Soviet Union]] had indeed abandoned the [[Allies]] at [[Tokyo]] and instead planned a devastating attack on major Allied cities, the Allies still managed to stop the Soviet plans at [[Havana]] in [[Cuba]]. Everything Dr. [[Gregor Zelinsky]] said to Field Marshal [[Bingham]] in regards to [[Anatoly Cherdenko|Premier Cherdenko]]'s manipulation of [[time]] to save the Soviet Union from defeat was true, and Bingham felt the time was right to "make [[USSR|the Soviets]] pay for their lies and betrayal". |
||
| + | ==Game unit== |
||
| − | Allied intelligence revealed the majority of the Soviet forces, as well as Cherdenko and [[General Krukov]], were stationed at [[Leningrad]] to protect the [[Peter and Paul Fortress]]. Cherdenko had the fortress converted into a shuttle launch facility to transport himself to the [[Moon]]. Destroying the fortress was necessary if the Allies wanted to arrest Cherdenko and Krukov and charge them for war crimes. To achieve this, Bingham sent his [[Allied Commander (Red Alert 3)|best field commander]] and [[Warren Fuller]] to assault Leningrad. |
||
| + | As the absolute cheapest unit in Red Alert- costing just 100 credits and featuring an extremely fast build time of 3 seconds- the Rifle Infantry are highly cost-efficient to make and can be massed with ease in a very short period of time. |
||
| + | Rifle Infantry possess several disadvantages- their mobility is low (despite their decent running speed, they tend to hit the dirt and move prone when under attack, reducing their movement speed heavily), their rifle attacks are weak against anything that isn't an infantry unit, and they can be run over by vehicles, or otherwise wiped out with ease (particularly by explosive weapons) considering their low health. |
||
| − | == New additions == |
||
| − | {| |
||
| − | |[[File:RA3_Proton_Collider_Icons.png|64px|link=Proton collider]] |
||
| − | |} |
||
| + | Despite this, Rifle Infantry are useful for countering enemy infantry attacks- they are the best unit for overpowering Rocket Soldiers, and work well when supported by vehicles. Additionally, they build so fast for so cheap that one can have a practically unending stream coming out of a Barracks, allowing a commander to plug gaps in their defense quickly. They are good for disposable scouting, and can be used to spot for artillery attacks. |
||
| ⚫ | |||
| − | === Micro-Siege === |
||
| − | {{Q|We're shrinking down some MCVs to run through the strong Soviet resistance. Set up a base deep in their territory so we can move in some forces.|[[Eva]]}} |
||
| + | When buildings are sold or destroyed, they often spawn a few rifle infantry. These infantry function identically to those trained normally, though rifle infantry spawned from destroyed buildings are damaged by default. |
||
| − | An advance guard of Apollo Fighters and Cryocopters attempted to fly over the southern plateau of the city, but were shot down by Soviet forces. Fortunately, the guard bought the Allies enough time to send in their main forces. |
||
| + | ==Legacy== |
||
| − | At the beginning of the battle, the Allies shrank several [[MCV]]s by using [[Cryocopters]] to get them quickly behind Soviet lines. When that rather risky move was successfully done, the Allies [[Chronosphere (Red Alert 3)|Chronoed]] in [[Mirage tanks]] to help clear the area from Soviet forces. The tanks quickly began engaging the Soviets, burning infantry with their spectrum cannons and employing their camouflage and gap generators to confuse the Soviets further. |
||
| + | ===Tiberium Universe=== |
||
| + | In the decades following the [[Second World War]], Rifle Infantry were eventually succeeded by [[Minigunner (Tiberian Dawn)|Minigunners]], used by both [[GDI]] and [[Nod]] during the [[First Tiberium War]]. Compared to the Rifle Infantry of the past, Minigunners had more modern weapons and wore modern uniforms including Kevlar helmets and body armour, but otherwise functioned identically to their predecessors. |
||
| + | ===Red Alert Universe=== |
||
| − | As the Allies got closer to the Construction Yard, the Soviets quickly positioned several Apocalypse Tanks and turned on their magnetic harpoons. As the mirage tanks closed in, the tanks desperately began drawing in the Allied tanks and shredding them with the grinder at the front of the vehicle. Fortunately, the other Allied tanks quickly adjusted fire to destroy the tanks before they could totally grind up the victims. |
||
| + | After the Second World War, the Allies and Soviets both replaced the Rifle Infantry. |
||
| + | The Allies had replaced their variant with the [[GI|G.I.]]. They had similar (albeit updated) armour and carried submachine guns when on the move. They could deploy sandbags to create light machine gun nests, which would afford them greater range and damage, but at the cost of being immobile while in this mode. However, they were also more costly than their predecessors. |
||
| − | With the last line of defensive units out of the way, the mirage tanks quickly shifted attention to the Soviet structures, destroying the Construction Yard and the nearby Flak Cannons and eliminating the Soviet presence from the plateau. |
||
| + | The Soviets had replaced their variant with the [[Conscript (Red Alert 2)|Conscript]]. They had heavier armour than before, but had to lose their assault rifles in place of submachine guns. They cost the same as their predecessors |
||
| − | That done, Premier [[Cherdenko]] revealed his final, somewhat insane, plan. |
||
| + | == Tactical Use == |
||
| − | {{Q|Commander, you’ve rained on my glorious parade! For this, I’m sending everything I’ve got at you. But I won’t let you have the satisfaction of catching me. I’m escaping to the ONE place that hasn’t been corrupted by capitalism! SPACE!|Premier Cherdenko}} |
||
| + | * Rifle infantry are best used supporting rocket infantry; the latter are far superior at engaging armor and aircraft, but are extremely vulnerable to rifle fire and do little anti-infantry damage. A large army of rockets and riflemen is cheap to build, quick to raise, and can roll over enemy forces. |
||
| + | * When an enemy deploys a large horde of rocket infantry, rifle infantry are fast to build and extremely cheap hard counters to rocket infantry. If one spots a large horde advancing on their base, and does not wish to waste expensive vehicles on countering the horde, using rifle infantry is the cheapest option. |
||
| + | * Rifle infantry are surprisingly effective when deployed against buildings en masse. While Soviet grenadiers and multi-national rocket units are superior in general, in a pinch a force of rifle infantry can tear up buildings in a reasonable time. |
||
| + | * Squads of around ten riflemen are very easy to set up, and are usually capable of dealing with enemy rocket infantry and even some light vehicles, though the latter will result in heavy casualties. Placing these squads around the map as scouts is a cheap way to extend your vision. Mixing rocket infantry into this will massively improve survival against vehicles. |
||
| + | * Allied medics can keep riflemen in the game for much longer, but are usually not worth the cost, especially since you can cheaply replace any losses. |
||
| + | * Do not simply build massive hordes and leave them laying around your base; riflemen are extremely susceptible to artillery and other area of effect attacks. If you have a large amount of infantry in general to defend with, spread them out and keep a reserve to rapidly call in once the bullets start flying. |
||
| + | ==Gallery== |
||
| − | The Allies were faced with a race against time (50 minutes on Easy difficulty, 30 on Normal, 20 on Hard) to destroy the fortress before the Premier’s shuttle was launched from it. |
||
| + | <gallery> |
||
| + | File:Rifle Infantry.jpg|Allied riflemen in Moscow |
||
| + | File:Allier Rifle Infantry M16.jpg|[[Allies|Allied]] Rifleman in [[Germany]] wielding [[M16]]s with bayonets fixed, as seen in a Soviet cinematic |
||
| + | </gallery> |
||
| ⚫ | |||
| − | === Fall of the Iron Curtain === |
||
| − | [[File:RA3 The Moon Shall Never Have Them.jpg|right|thumb|Soviet Premier's fortress under Iron Curtain effect]] |
||
| − | {{Q|“Maybe we should let them go to the Moon!" <br/> "That fancy fortress explains why the Reds choose to make a stand at Leningrad of all places.”|Warren and a Spy}} |
||
| − | |||
| − | The Soviet Premier's fortress in the middle of the island was protected by seven Iron Curtains and his elite guard, which were protected by the Iron Curtains too. Because of that, the Allied Commander had to focus on taking down those Iron Curtains. [[Warren Fuller|Warren]] decided to take the western three devices, while the Unknown Commander decided on the eastern three. |
||
| − | |||
| − | The first one was protected by War Factories and many vehicles. The Allies sent [[Guardian Tanks]] and Mirage Tanks to counter the horde of vehicles. In an ensuing tank battle between Allied Guardian and Soviet [[Hammer tank]]s, the Iron Curtain was destroyed, along with some of the Factories. The Allies then captured the remaining the Soviet War Factories and the [[Battle lab (Red Alert 3)|battle lab]] to prevent the Soviets from deploying more Apocalypse tanks. The Allies, proceed with the next plan to destroy the Soviets, activating the Mirage Tanks’ GAP Generators while having some Apocalypse Tanks and [[Bullfrog transport|Bullfrogs]] escorting to the next target. |
||
| − | |||
| − | The second curtain was surrounded by garrisons of [[Flak Troopers|Flak Troopers and]] [[Conscripts]], but heavy bombardment from [[Athena Cannon]]s utterly destroyed those garrisons and the Flak Troopers were killed. The Iron Curtain was then obliterated from space with a laser. |
||
| − | |||
| − | The third Iron Curtain was guarded by some ground troops, including a single Apocalypse tank, and [[MiG (Red Alert 3)|MiGs]] from several Airfields. Using a blast from the [[Proton Collider]] to destroy the Airfields and the guards, this cleared the way for bombers to level the third curtain. |
||
| − | |||
| − | The western Iron Curtain bases were set up in a similar way, enabling Commander Warren to progress almost as fast as the Commander on the eastern side, which would help in moving to the final Iron Curtain. One of the Iron Curtains were protected heavily with Apocalypse Tanks so instead of doing a frontal assault, Spies bribed the Apocalypse Tanks and the Apocalypse Tanks begin serving the Allies by firing their Drakon vehicles, on the Soviet bases and destroying the Iron Curtain. The Allied army marched on and destroyed the remaining Soviet bases. |
||
| − | |||
| − | === The Vacuum Imploder === |
||
| − | {{Q|I’ve got something up my sleeve for you Commander. Why don’t you come a little closer to my base?|Krukov bringing a Vacuum Imploder superweapon online}} |
||
| − | As soon as the third Iron Curtain was destroyed by the Allied Commander, Soviet Commander Krukov brought a Vacuum Imploder online, planning to destroy the Allied base. Through luck and cunning, Warren had just destroyed his third curtain, which enabled the Allies to perform a pincer move, crushing the base, killing Natasha (seemingly, although this was never officially confirmed), and destroying the final Iron Curtain and the Vacuum Imploder before it could fire. |
||
| − | |||
| − | Casualties were very high for both sides in the attack. The Soviets had well-coordinated defenses, with [[Tesla Coil (Red Alert)|Tesla Coils]] defending the two bridges leading into the Soviet base, while [[Flak Cannon]]s and [[MiG (Red Alert)|MiGs]] covered the sky. [[Dreadnought]]s were docked in the canals, prepared to pound the Allies as they advanced. |
||
| − | |||
| − | Soviet [[Apocalypse tank (Red Alert 3)|Apocalypse]] and [[Tesla tank (Red Alert 3)|Tesla tanks]] rolled out to meet the Allies' assault. However, the Allies had brought [[Athena Cannon]]s and [[Mirage Tank]]s to the party, along with the full might of the Allied air force. [[Vindicator]]s made bombing runs on the Soviet armored divisions, while [[Apollo Fighters|Apollo]] and [[MiG (Red Alert)|MiGs]] tore each other, down to shreds in the skies above. |
||
| − | |||
| − | {{Q|“We’re running out of time, Commander. Don’t let the Premier get away!”<br/>”Are you not going to make it to my send-off, Commander?”|Field Marshal Robert Bingham and Premier Cherdenko as the shuttle nears its launch}} |
||
| − | |||
| − | [[B2-X Century Bomber|Century Bombers]] made bombing runs on the [[Dreadnought]]s in the canals, removing them from the battle. Eventually, the combined arms of the Allies overwhelmed the Soviet defenders, and the [[Iron Curtain (Red Alert)|Iron Curtains]] and the [[Vacuum Imploder]] were destroyed. |
||
| − | |||
| − | === One Final Siege === |
||
| − | {{Q|“Five minutes until shuttle launch. The situation is reaching critical mass.”<br/>”Dasvidaniya, Commander! I'll send you a postcard from my space station!”|Allied advisor warning of short time remaining, and Cherdenko seeing the Shuttle close to launch}} |
||
| − | |||
| − | Now, as the Iron Curtains were down, the fortress was still heavily defended by numerous Soviet units, such as Tesla Tanks, MiGs, [[Kirov Airship (Red Alert 3)|Kirovs]], Desolator Bombers, [[V4 rocket launcher]]s and Apocalypse Tanks, to name a few. In addition, the fortress was heavily armoured and, as such, very hard to destroy. Nonetheless, the Allies had their Proton Colliders ready to fire, which resulted in a devastating effect on the island-fortress. |
||
| − | |||
| − | Krukov sent a final Apocalypse tank battalion in an attempt to kill Warren but was destroyed by a Mirage Ambush and a Century Bombing Run by the Commander. |
||
| − | |||
| − | With most of the defenses destroyed, the MiGs and Kirovs shot down from the sky, and troops ready to be chronoed onto the island, a final bombing run was performed to clean the field in front of the fortress. The Allied Commanders used the [[Chronosphere (Red Alert 3)|Chronosphere]] to send their best units, which included several Athena Cannons and Mirage Tanks, to the island. Once there, the Mirage Tanks destroyed the final roaming Soviet units, while the Athena Cannons colored the spaceship to pieces, resulting in a spectacular strike which leveled the entire castle and the spaceship with it. |
||
| − | |||
| − | == Aftermath == |
||
| − | {{Q|It's been a privilege and an honor sir. You are a fine commander and a true hero to the Allies.|Warren}} |
||
| − | [[BCN]] made headlines, that both [[Premier Cherdenko]] and [[General Krukov]] are imprisoned in a [[cryoprison]] to stop them from escaping and starting war again. In [[London]], [[Bingham]] tells the Commander that it was excellent that Soviet forces had surrendered, but a new war will be coming soon and [[Eva McKenna]] invites the Allied Commander to his date with [[Tanya (RA3)|Tanya]], in the process. |
||
| − | |||
| − | But that was merely a prologue of yet another bloody chapter of human history and the beginning of the Allies' worries in this new age, as the Tatsu-led puppet government in [[Japan (Red Alert)|Japan]] is about to be besieged by the remaining shogunate, namely [[Kenji Tenzai]], [[Shinzo Nagama]] and [[Takara Sato]]. Meanwhile, [[Tatsu]] has plans for the Soviets and Allies - plans that can very well mean Imperial independence. |
||
| − | |||
| − | The tremor within after-war [[Allies]] also surfaces in the form of [[FutureTech]] under the ambitious hand of EU president [[Rupert Thornley]]. Armed with the full arsenal of democracy and willing to be relentless against any possible threats, fears and suspicions have been raised as the once-greatest contributor of peace might have become the new warmonger. The difference between "victory" and "liberty" was never depended on ''who'' won the war, but ''how'' to win the war. |
||
| − | |||
| − | What's more, reports of a "[[Soviet Underground]]" were starting to spread, showing that the Soviet Union's far from defeated. And as if that is not enough, one of the Empire's bioweapons, for reasons yet to be known, is about to tear the entire Shiro Psychic Research Facility apart from the inside once more... |
||
| − | |||
| − | [[The Uprising]] has begun. |
||
| − | |||
| − | ==Walkthrough== |
||
| − | The first part is deploying the Allied MCVs to two locations. Be sure to take a wide path to the target, around the Ore Mines, to avoid being crushed by patrolling Hammer Tanks, while keeping an eye on the timer indicating when the shrink effect will wear off. The target location is indicated by flares that appear one by one in a circle as the timer ticks down, with an objective marker in the centre. This is also where your chrono reinforcements will arrive. |
||
| − | |||
| − | The next part involves using Mirage Tanks to destroy the Soviets. Beware: losing even one will make the mission harder. Destroy the Hammer Tanks and Apocalypse Tanks first, then the Soviet base. Beware of the Apocalypse Tanks using their special magnetic harpoon ability to drag your tanks towards them and grind them to shreds. |
||
| − | |||
| − | The next part involves building up an army to counter the Soviets. The new weapon for the player is the Proton Collider. Use it to destroy the Soviet bases. Note that Warren will also build one and each time it is ready to fire, you can have him target an Iron Curtain with it and this can be done in tandem with your own Proton Collider to deal even more damage. |
||
| − | |||
| − | Remember that land supremacy is the Soviets’ specialty. Send in Mirage tanks and escort the Engineers to capture the Soviet tank base and build a Soviet MCV. Combine Soviet weaponry with Allied weaponry to make the mission easier. |
||
| − | |||
| − | Destroying all seven Iron Curtains is the only way to make the Launch platform vulnerable. After three of them get destroyed, Krukov will arrive with a Vacuum Imploder and some Tesla and Apocalypse tanks. |
||
| − | |||
| − | Once the Iron Curtains are all destroyed the Launch platform on the island is vulnerable but the island is guarded by Tesla Tanks, V4s, Migs and Kirovs. Use the Chronosphere to teleport the Mirage tanks and destroy it before the Premier can escape. |
||
| − | |||
| ⚫ | |||
<center> |
<center> |
||
| + | {{#ev:youtube|VrYZCpiwE8Y||inline|Entrenched rifle soldiers overrun||autoplay=false}} |
||
| − | {{YouTube|EF-WT0XgYuY|Briefing}} |
||
| + | {{#ev:youtube|LiU12QzsdO0||inline|Rifle soldiers emerging||autoplay=false}} |
||
| − | {{YouTube|6StpaSLvzYs|Epilogue}} |
||
</center> |
</center> |
||
| − | == |
+ | ==Trivia== |
| + | * Although the game manual says that Allied soldiers are armed with M16s and Soviet soldiers with AK-47s, the game code identifies both weapons as [http://en.wikipedia.org/wiki/M1_carbine M1 carbine]. Allied riflemen in cutscenes, however, are always shown using the M16. |
||
| − | <references /> |
||
| + | |||
| ⚫ | |||
| ⚫ | |||
| + | * {{L|Minigunner|Tiberian Dawn}} - The successor to the Rifle infantry during the [[First Tiberium War]]. |
||
| + | * {{L|Light infantry|Dune 2000}} - The basic infantry in ''[[Dune 2000]]''. |
||
| ⚫ | |||
| + | {{Red Alert 1 Soviet Arsenal}} |
||
| + | [[Category:Red Alert 1 infantry]] |
||
Revision as of 02:32, 23 June 2021
Rifle infantry are the basic light infantry of the Allied and Soviet armies in Red Alert 1. Flexible and cheap but individually weak, they are the core of both the Allied and Soviet armies.
Background
As basic infantry, riflemen often take the brunt of an assault. They are armed with assault rifles that just entered widespread use at the beginning of the war (the AK-47 in the Soviet Union and the M16 among the Allies) and usually don't wear much protection - usually only fatigues and steel helmets.
Game unit
As the absolute cheapest unit in Red Alert- costing just 100 credits and featuring an extremely fast build time of 3 seconds- the Rifle Infantry are highly cost-efficient to make and can be massed with ease in a very short period of time.
Rifle Infantry possess several disadvantages- their mobility is low (despite their decent running speed, they tend to hit the dirt and move prone when under attack, reducing their movement speed heavily), their rifle attacks are weak against anything that isn't an infantry unit, and they can be run over by vehicles, or otherwise wiped out with ease (particularly by explosive weapons) considering their low health.
Despite this, Rifle Infantry are useful for countering enemy infantry attacks- they are the best unit for overpowering Rocket Soldiers, and work well when supported by vehicles. Additionally, they build so fast for so cheap that one can have a practically unending stream coming out of a Barracks, allowing a commander to plug gaps in their defense quickly. They are good for disposable scouting, and can be used to spot for artillery attacks.
When buildings are sold or destroyed, they often spawn a few rifle infantry. These infantry function identically to those trained normally, though rifle infantry spawned from destroyed buildings are damaged by default.
Legacy
Tiberium Universe
In the decades following the Second World War, Rifle Infantry were eventually succeeded by Minigunners, used by both GDI and Nod during the First Tiberium War. Compared to the Rifle Infantry of the past, Minigunners had more modern weapons and wore modern uniforms including Kevlar helmets and body armour, but otherwise functioned identically to their predecessors.
Red Alert Universe
After the Second World War, the Allies and Soviets both replaced the Rifle Infantry.
The Allies had replaced their variant with the G.I.. They had similar (albeit updated) armour and carried submachine guns when on the move. They could deploy sandbags to create light machine gun nests, which would afford them greater range and damage, but at the cost of being immobile while in this mode. However, they were also more costly than their predecessors.
The Soviets had replaced their variant with the Conscript. They had heavier armour than before, but had to lose their assault rifles in place of submachine guns. They cost the same as their predecessors
Tactical Use
- Rifle infantry are best used supporting rocket infantry; the latter are far superior at engaging armor and aircraft, but are extremely vulnerable to rifle fire and do little anti-infantry damage. A large army of rockets and riflemen is cheap to build, quick to raise, and can roll over enemy forces.
- When an enemy deploys a large horde of rocket infantry, rifle infantry are fast to build and extremely cheap hard counters to rocket infantry. If one spots a large horde advancing on their base, and does not wish to waste expensive vehicles on countering the horde, using rifle infantry is the cheapest option.
- Rifle infantry are surprisingly effective when deployed against buildings en masse. While Soviet grenadiers and multi-national rocket units are superior in general, in a pinch a force of rifle infantry can tear up buildings in a reasonable time.
- Squads of around ten riflemen are very easy to set up, and are usually capable of dealing with enemy rocket infantry and even some light vehicles, though the latter will result in heavy casualties. Placing these squads around the map as scouts is a cheap way to extend your vision. Mixing rocket infantry into this will massively improve survival against vehicles.
- Allied medics can keep riflemen in the game for much longer, but are usually not worth the cost, especially since you can cheaply replace any losses.
- Do not simply build massive hordes and leave them laying around your base; riflemen are extremely susceptible to artillery and other area of effect attacks. If you have a large amount of infantry in general to defend with, spread them out and keep a reserve to rapidly call in once the bullets start flying.
Gallery

Allied riflemen in Moscow
Videos
Trivia
- Although the game manual says that Allied soldiers are armed with M16s and Soviet soldiers with AK-47s, the game code identifies both weapons as M1 carbine. Allied riflemen in cutscenes, however, are always shown using the M16.
See also
- Minigunner - The successor to the Rifle infantry during the First Tiberium War.
- Light infantry - The basic infantry in Dune 2000.
| |||||||||||||||||||||||||||||||||||||||||||||||||||


| ||||||||||||||||||||||||||||||||||||||||||||||||